


Grandmacore for the Win
September 20, 2026 • No Comments
 When I was in school, the subject of home economics was, to put it politely, considered past its prime. Homemade clothes were uncool, and acceptable snacks were of an unnatural chemistry impossible to replicate in a common kitchen. Scratch cooking was woefully Little House on the Prairie or, for the grimly imaginative, witches of Macbeth.
But that was then. Now there’s a sudden resurgence of “analog” crafts, aka Grandmacore hobbies, especially among younger consumers. For those who remember disdaining Home Ec, one might be forgiven a touch of whiplash as sewing, knitting, quilting, baking, gardening, and canning trend like mad. After years of having to hunt for supplies, retail options cram my social media feed.
Why? Breaking free of the relentless doom scroll is an obvious reason to take up, well, just about any hobby. A pastime that hones life skills is even better. Both the pocketbook and the landfill benefit if one knows how to mend or cook a basic meal: less waste, less packaging, more value. And, something made by human hands is just nicer, whether it’s a Christmas gift or dinner. It carries a bit of the maker with it in a lovely and personal way.
Peak Grandmacore includes canning and preserving. I’ve done a little, so when the subject came up among friends, I stuck my hand up to participate in a pickle-making session as I had some of the necessary equipment. So it was that three of us gathered to produce six dozen jars of crunchy dill delights. For anyone curious, this is the basic recipe we used. 
One friend purchased the cucumbers and dill from a local farmer, so they were absolutely fresh when they arrived in my kitchen, still smelling of sunshine and a salt bath. The next hours were all about fragrant spices, sparkling clean jars, chatter, snacks, steam, and shared work. Women have always known how to divide and conquer complex tasks—just ask Macbeth’s witches. There is a magical connection in shared physical labor that can’t be replicated online.
And here’s another reason to break out the ladles and crochet hooks—community. Sewing bees and quilting circles have long existed as an excuse for getting together based on shared crafting goals. Friendship and creative communion are a powerful mix. It’s living real life in the best possible way.
My grandmother—the one who taught me how to bake when I could barely reach the counter—would be gratified that the younger generations are finally figuring this out.
Dill pickle recipe:
Here are the ingredients we used:
For the bottom of each quart jar:
1/8 tsp calcium chloride (for crispness)
1tsp mustard seeds
1tsp black peppercorns
¼ tsp red pepper flakes
2 or 3 peeled garlic cloves
Head and ferns of fresh dill (put some on top as well)
The brine recipe:
8 cups water + 8 cups vinegar + heaping 1/3 cup of granulated sugar.
These are the very basic instructions. I recommend watching this video , especially if you haven’t used a water bath for canning before. Put the spices in sterilized canning jars, fill with clean pickling cucumbers and top with brine (leave about ½ inch at the top). Poke with a chopstick to release any bubbles. Seal until finger tight. Process in a water bath per instructions in the video. Let cool and then tighten seal. Leave 4 to 6 weeks before consuming.
Please note this process involves pots of boiling water and other hot equipment. Although I paid the price in feline wrath afterward, I locked my oh-so-curious cats upstairs during the process for everyone’s safety.
Applesauce Loaf
August 7, 2022 • 2 Comments
 Every autumn I turn the scruffier apples from my tree into applesauce. If I’m lucky, I can also scrounge extras from friends who have a bumper crop. Applesauce is great in baking, so I freeze as many pints as possible. It’s a moderate amount of work, but the payoff is worth it.
Here’s an easy applesauce loaf so moist it doesn’t need butter. The recipe makes two loaves, so I have one to freeze or give away.
Preheat oven to 350F. Lightly grease 2 loaf pans.
Sift together dry ingredients:
- 4 cups all-purpose flour
- 2 teaspoons baking soda
- 1 teaspoon baking powder
- 5 teaspoons cinnamon
- 1 teaspoon nutmeg
- ½ teaspoon allspice
- ½ teaspoon mace (optional)
- ½ teaspoon salt.
Combine:
- 2 ½ cups of applesauce
- ¾ cup sugar (could be more or less depending on preference)
- ¾ cup melted butter or vegetable oil
- 3 eggs
- 1/3 cup milk or kefir (I use coconut kefir)
Fold dry ingredients into the wet ingredients a little at a time until thoroughly mixed. Finally, mix in:
- 1 cup of nuts (walnuts, hazelnuts, or pecans are good)
Divide batter between the pans and bake for an hour or until a knife comes out clean. This may depend on the amount of water in your applesauce, so be sure to test it and bake a little longer if necessary.
I recommend this with sharp cheddar as a quick lunch on the run.
Mysterious Green Sauce
July 5, 2021 • No Comments
 Despite the title, I resist the term “green sauce” because (something like the enigmatic “brown sauce” encountered in the UK) I feel as if the creator won’t admit to what’s in it. Lots of things are green, but I won’t put all of them in my mouth.
No need to fear this version! This green sauce quick, easy, and very taste-bud friendly. Although the obvious use is on pasta, it’s also good as a garnish on potatoes, a mixed vegetable plate, or even salad. I also suggest trying it on fish.
Recipe:
I start with two large bunches of kale, stems removed and lightly steamed.
While that’s happening, I fry one small diced onion in a little olive oil. Once that’s starting to brown, add a generous handful of sliced mushrooms and 3 to 4 cloves of crushed garlic. Once that’s thoroughly cooked, set it aside. For those who are not garlic/onion tolerant, feel free to substitute a powdered version.
Put the kale into a blender
Add 2 ripe avocados
Add the onion mix
Add 3 heaping teaspoons of nutritional yeast
2 teaspoons of mixed dried herbs or whatever fresh ones you have in the garden (suggest oregano, marjoram, basil, or thyme)
1 ½ to 2 cups of kefir (can substitute plain yogurt)
Juice of one lime
Salt to taste
Blend until it’s smooth and creamy with no traces of solid kale.
Serve generously over pasta. For a final touch, garnish your pasta dish with pine nuts or broiled, halved cherry tomatoes.
This will keep in the fridge for a few days. A wide-mouthed jar is perfect for this.
Coconut Squash Soup
June 7, 2021 • No Comments
 The tale of this coconut squash soup begins with a trip to the farmer’s market, where a New Zealand blue squash followed me home. The variety was new to me (and, apparently, to the cat) so I was curious to see what I could do with it. As it turns out, this variety cooks up nicely with a flavor between a butternut squash and a pumpkin.
Quarter the squash, scoop out the seeds (these can be saved and roasted later) and bake on a cookie sheet at 325F until fork tender. Peel off the skin and mash. This should give you around 4 cups of cooked squash. If you have too much, it freezes well.
Fry until thoroughly cooked:

3 tablespoons olive oil
1 large diced onion
2 cloves garlic, crushed
1 tablespoon finely chopped ginger
Add:
1.5 tsp cumin
1.5 tsp coriander
1/2 tsp cardamom
1 tsp salt
1/4 tsp pepper
Cook for two minutes and add:
Your squash
6 cups vegetarian broth (low salt is best–you can add salt if needed)
Optional: Fresh garden herbs, if available (I use chives, oregano, and thyme)
1 can (14-oz) of low-fat coconut milk
Simmer for about half an hour. At the very end, add the juice of 1 lime. Then puree thoroughly so there are no lumpy squash bits.
This coconut squash soup is a very attractive, colorful soup, and makes a great centerpiece of a light meal.
Victorian Funeral Biscuits – the Recipe
April 26, 2021 • 4 Comments
 Funeral biscuits played a part the Victorian tradition of death and mourning. I cover their history in my previous post on the topic, and now we come to the recipe.
Sadly, it’s hard to know exactly what the biscuits tasted like. Even if they were available in a museum somewhere, I’m not like the Eating History guys and willing to nosh on decades-old treats. To make things more difficult, I could not find funeral biscuits in a cookbook I trusted. One recipe included modern ingredients and others were vague to the point of uselessness. So, I set out to invent something from those items that appeared in the majority of texts.
Consistent ingredients were flour, sugar, and caraway seed. I tested various combinations of other things, including icing sugar, milk, and cornstarch. Results varied from interesting charcoal to hard as a brick. When I did finally achieve a good result, I understood why rationing during wartime finally finished off the production of these biscuits–they’re no good without lashings of butter.
Victorian Funeral Biscuits
Preheat oven to 350 F
Cream: 1.5 cups of sugar with 1 cup of soft butter
Add: 1 tsp vanilla and 2 extra-large beaten eggs (or 3 smaller ones). Mix until smooth
Sift: 2.5 cups of flour, 2 tsp of cardamon, and 1/2 tsp salt. Add to wet ingredients a bit at a time along with a tablespoon of whole caraway seeds (some recipes recommend toasting these before adding them to the dough).
Mix until all wet ingredients are absorbed. The dough will be slightly sticky. If you wish to use a cookie stamp, chill for a few hours before going further. Otherwise, make a small ball and press with a fork to form the cookie. Keep rinsing the fork in cold water to keep it from sticking in the dough.
Bake on a greased cookie sheet for 12 minutes or until the bottom just begins to turn brown. (Do not overbake!) Cool slightly before moving to a wire rack. The result should be a crisp, slightly caramelized bottom with a softer top.
 As noted above, this recipe is only an estimation of what the original Victorian funeral biscuits might have been like. The quality of ingredients today is very different, as those of us who experienced “Buttergate” can attest. However, I think this is a reasonable approximation of the buttery, slightly spicy biscuit that’s perfect with tea after a brisk seaside stroll.
Gluten-Free Almond Chocolate Chip Cookies
February 5, 2021 • 2 Comments
Not all gluten-free products belong on a diet plan. Some recipes are shamelessly loaded with sugar and butter, like this one. Needless to say, it’s so yummy even the most ardent junk food addict will enjoy it.
Gluten-Free Almond Chocolate Chip Cookies
Preheat oven to 350F
Cream:

3/4 cup of sugar (try ½ cup brown to ¼ white)
2/3 cup soft butter
I used a food processor with a mixer blade for this—thoroughly creaming the butter makes a better cookie.
Mix in:
½ tablespoon vanilla
2 eggs
½ tsp salt
½ tsp baking soda
3 cups of almond flour
1 cup milk chocolate chips
Spoon onto greased cookie sheets. These cookies spread quite a bit, so make them small and give them lots of room. In my oven, 12 minutes was the perfect time to get a golden-brown cookie with a crispy outside and soft inside. When the cookie sheet comes out of the oven, allow it to cool slightly before transferring the cookies to a cooling rack.
Savory Cheese Shortbread
January 24, 2021 • 8 Comments

While tea is essential in all months, winter highlights its restorative properties. And with tea comes biscuits—spirits and stomachs need a boost in the twilight hours of the afternoon.
This is a savory shortbread recipe that’s been in my family for at least three generations–I don’t know its origins, but it was a frequent flyer at my grandmother’s table. It typically appeared at Christmas, but it’s good all year around. I made it recently and was reminded why I liked it so much—it pairs well with a strong English Breakfast style tea without being lost or overwhelming the flavor of the tea. In other words, this shortbread has personality.
A note on the cheese: MacLaren’s Imperial Sharp Cheddar is an iconic Canadian grocery item. In fact, there is an early version of the container in the Canadian Museum of History. For substitutions, keep in mind that it’s very sharp and stiffer than a true cream-cheese style product. The internet recommends Black Creek Sharp Cheddar Cold Pack Cheese as an alternative, but I’ve never tried it myself. If you do, please let me know how it turns out.
Ingredients:
- ½ pound McLaren’s Imperial Cheese
- ½ pound butter
- 2 cups flour
- 2 tablespoons light brown sugar
Mix ingredients either by hand or in a food processor and knead slightly until it can be formed into a roll and sliced. Make a ball from each slice and press with a fork. Bake on ungreased cookie sheets at 250 F for an hour (or until the bottom browns a bit). Cool on a rack before storing in a tin.
The Best Cheese Scones Ever
June 21, 2020 • No Comments
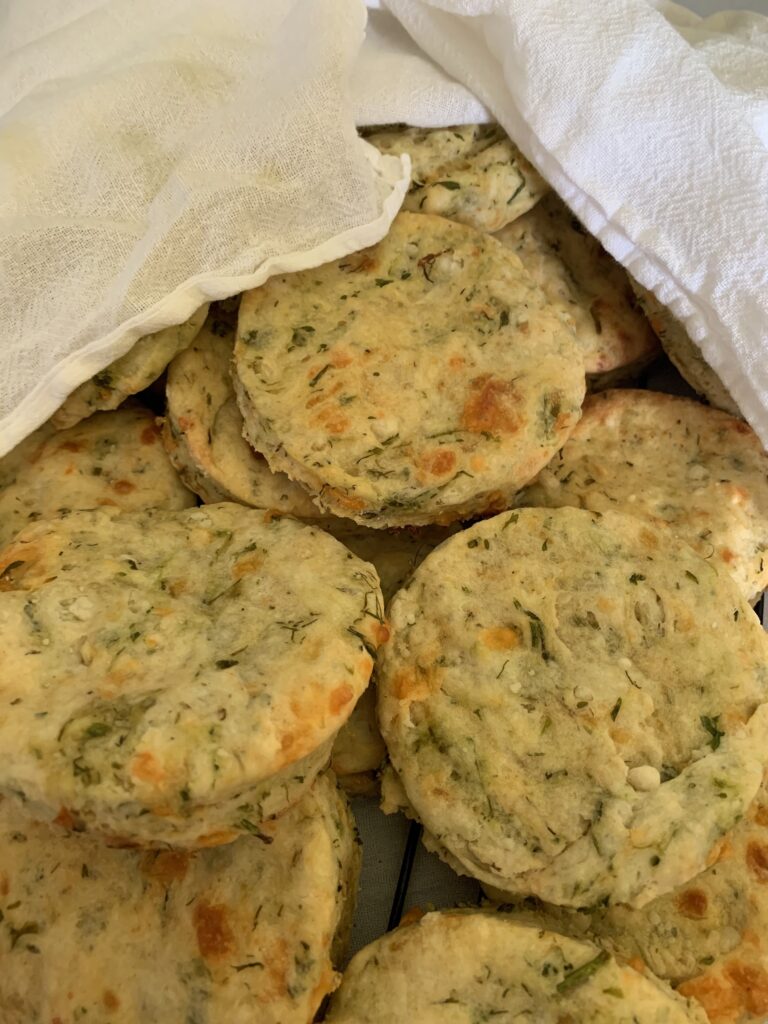 For those days when life requires comfort food, I give you this recipe for the best cheese scones ever. It’s light and tasty and goes with soup, salad, or a ploughman’s lunch.
Heat oven to 425 F and grease a baking tray or two (I usually double the batch).
Sift:
. 2 cups flour
. 1 tsp baking powder
. 1 tsp cream of tartar
. 1/2 tsp sea salt
. 1 tsp dried chervil (oregano would probably work, too)
Work in so it’s not clumpy:
. 1/3 cup minced parsley
. 1/3 cup minced fresh dill
Cut in 1/4 cup of soft butter until it’s like fine breadcrumbs. Then add:
. 1 cup shredded cheddar cheese
Make a well in the center and pour in:
. 1/2 cup to 2/3 cup heavy cream.
Start with a half cup of liquid and mix with a wooden spoon until all the dry ingredients are absorbed. Add more liquid if it seems too dry. Turn onto a floured board and knead just enough to make the dough elastic. Pat into a round about an inch thick and cut into rounds with a cookie cutter until all the dough is used up. If you prefer, rolling the dough into snakes will make pretty good bread sticks for dipping into hummus or tzatziki.
Brush the tops of the scones with a little milk, then bake for 15 to 20 minutes or until the tops are golden. Cool on a wire rack.
Don’t be shy about doubling or tripling the recipe – these are perfect for taking to the office, making care packages for friends, or freezing in smaller amounts. They can also be split and toasted in a toaster oven. I like them with avocado and sliced tomato with a pinch of carrot and beet sauerkraut. In another mood, they’re great with a tart currant jelly.
Corsair’s Cove tries the click bait so you don’t have to!
December 1, 2019 • No Comments
This is cross-posted from the Corsair’s Cove blog:
 Our companion short stories are like chats with a friend, in a cafe or at a kitchen table, with a delicious beverage. Naturally, news of a popular new winter treat caught our attention!
A recipe for a chocolate and red wine combo has been making the rounds of Facebook. The original came from Shape Magazine’s article How to Make Red Wine Hot Chocolate. Although doubtful, I like the magazine and was curious enough to give the recipe a spin. Twice.
Try number one followed the recipe using a good cabernet sauvignon on the plummy side, figuring that would be a good compliment to the chocolate. I used semi-sweet dark chocolate wafers that were supposed to be better quality than regular chocolate chips. The wafers melted but then the wax and other un-chocolately elements clumped when the wine was added to leave floaty residue in the drink. Maybe heating the wine first would have helped the texture, but that wasn’t the only drawback. The flavour was sweet and sour, but not in the best way. Sort of like heartburn with cake. Adding cinnamon helped. Adding marshmallows did not.
Try number two was better. I used a good instant unsweetened spiced dark chocolate that dissolved and stayed that way. This gave a much better mouth feel and, since I could limit the sugar, the wine didn’t crash the party like an awkward uncle. I’m still not a fan of the flavour combo, but this version had more potential. If I was very cold from, say, shoveling the walks after a foot of snow, I might even appreciate it.
I didn’t persevere to a third attempt. Super high quality grated European drinking chocolate might be worth a try to give a heavier body to the drink, but it might also be a waste of expensive ingredients. Rum, brandy or liqueur are classic adds to hot chocolate for a reason. In my humble opinion, grab the Bailey’s for winter night tipples and leave the reds for the dinner course.
In which I make a movie about applesauce
December 4, 2018 • No Comments
Every so often a nifty toy comes my way, and this very simple video maker (Lumen 5) thrills me to bits. Some of the photos in this are mine, too, which adds to the fun. The content is self-explanatory–nothing profound here, just an applesauce recipe in pictures rather than a boring old index card. Visit https://lumen5.com/ a try for yourself! I bet it would make a great virtual greeting card, too!